Using GigaBook Calendar Features
How to use the various Calendar features within your GigaBook account
GigaBook’s calendar is designed with flexibility and ease of use in mind. Sharing calendars with other service providers or syncing to other calendar formats will keep you and your business organized. Based on user preference, the calendar can be viewed in several formats: daily, weekly, or monthly. The calendar also offers a unique system to track the success rate of scheduled appointments. And by assigning your providers a specific color, you’re able to view your calendar and quickly see appointments and/or events assigned to each provider.
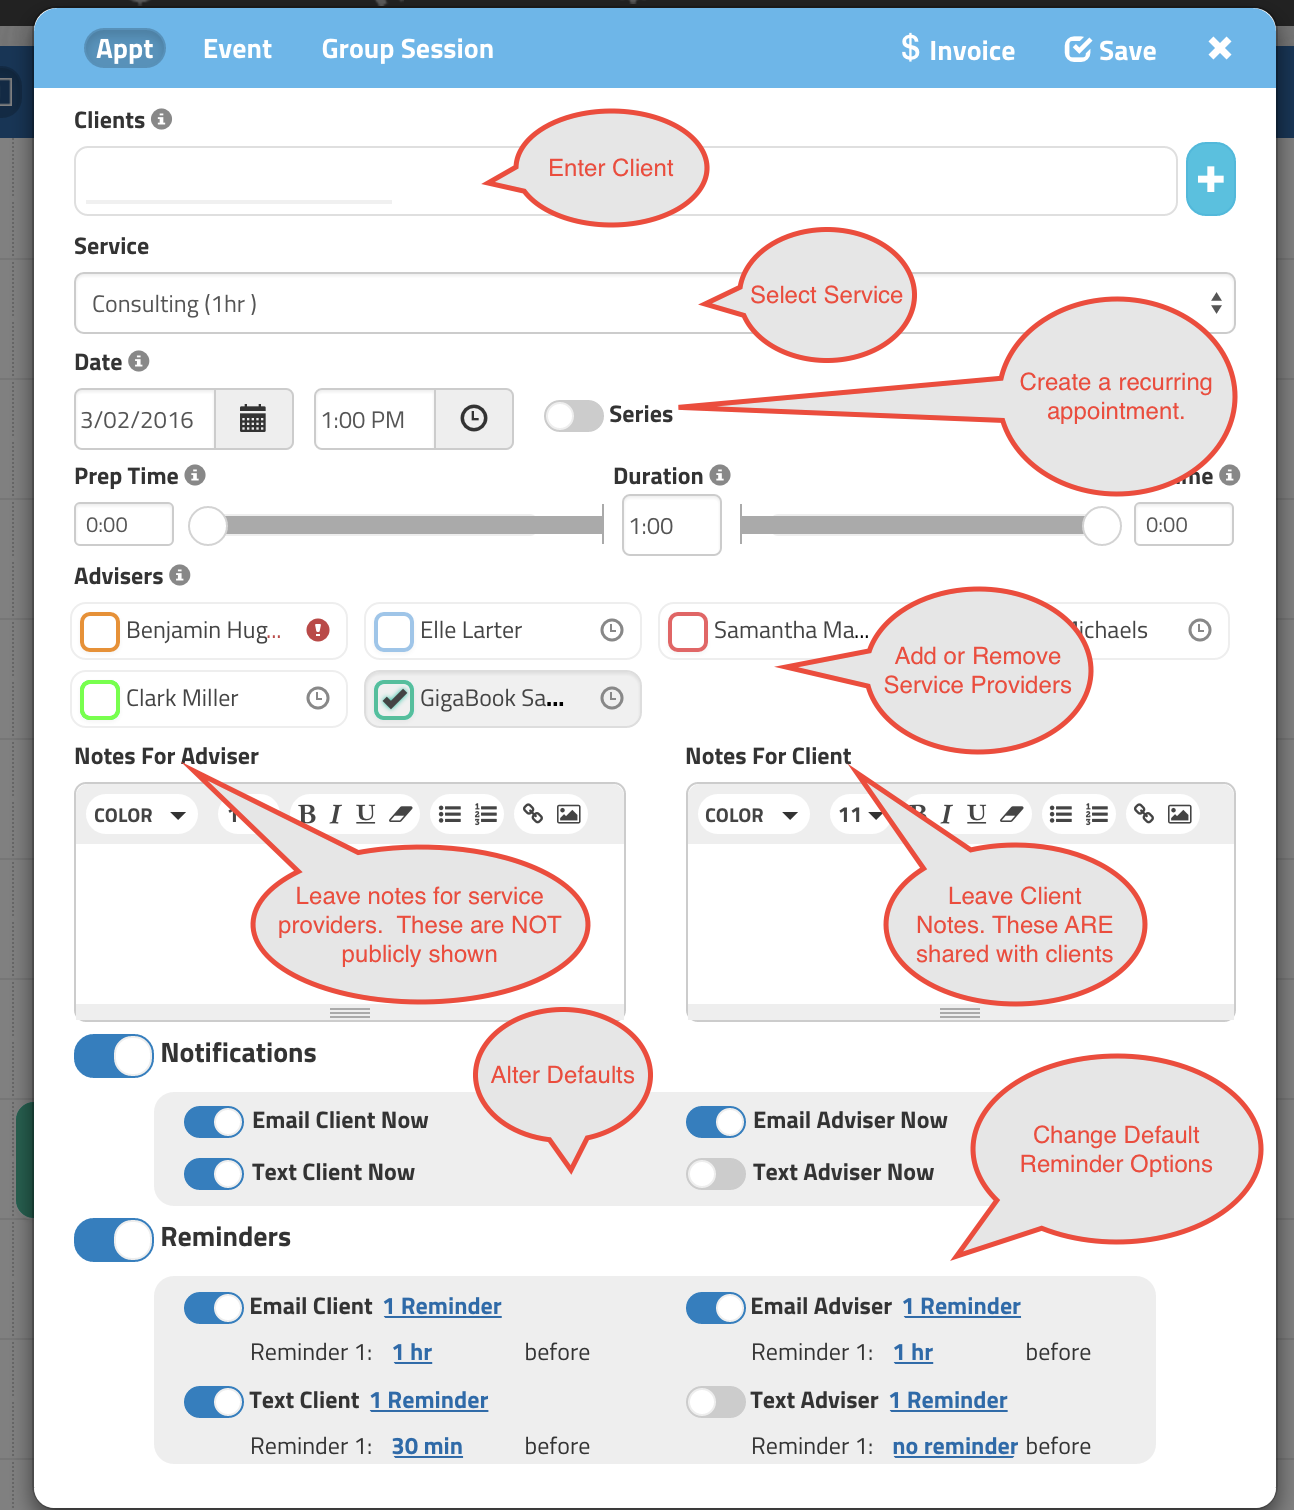
Add an Appointment (clients, meetings)
- In the Calendar dropdown on the navigation bar, click on ‘New’ or the Plus icon in the upper right corner of the calendar.
- Click on ‘Appt’ at the top of the window.
- Enter Client information.
- Select Service being provided.
- Check provider being assigned.
- Select date and time.
- Enter any notes specific to the appointment.
- If there’s a reoccurring appointment, click on the repeat button and enter the number of times (days) it will repeat, the date it starts, time, and date it ends.
- Click notification button when appointment is scheduled to send email and/or text to client and/or assigned provider.
- Click Reminders button to send up to three emails and/or up to 2 text messages to client and/or assigned provider.
- Click Save and close window.
This is what the appointment entry panel looks like:
Add an Event (tasks, lunch appointment, conference)
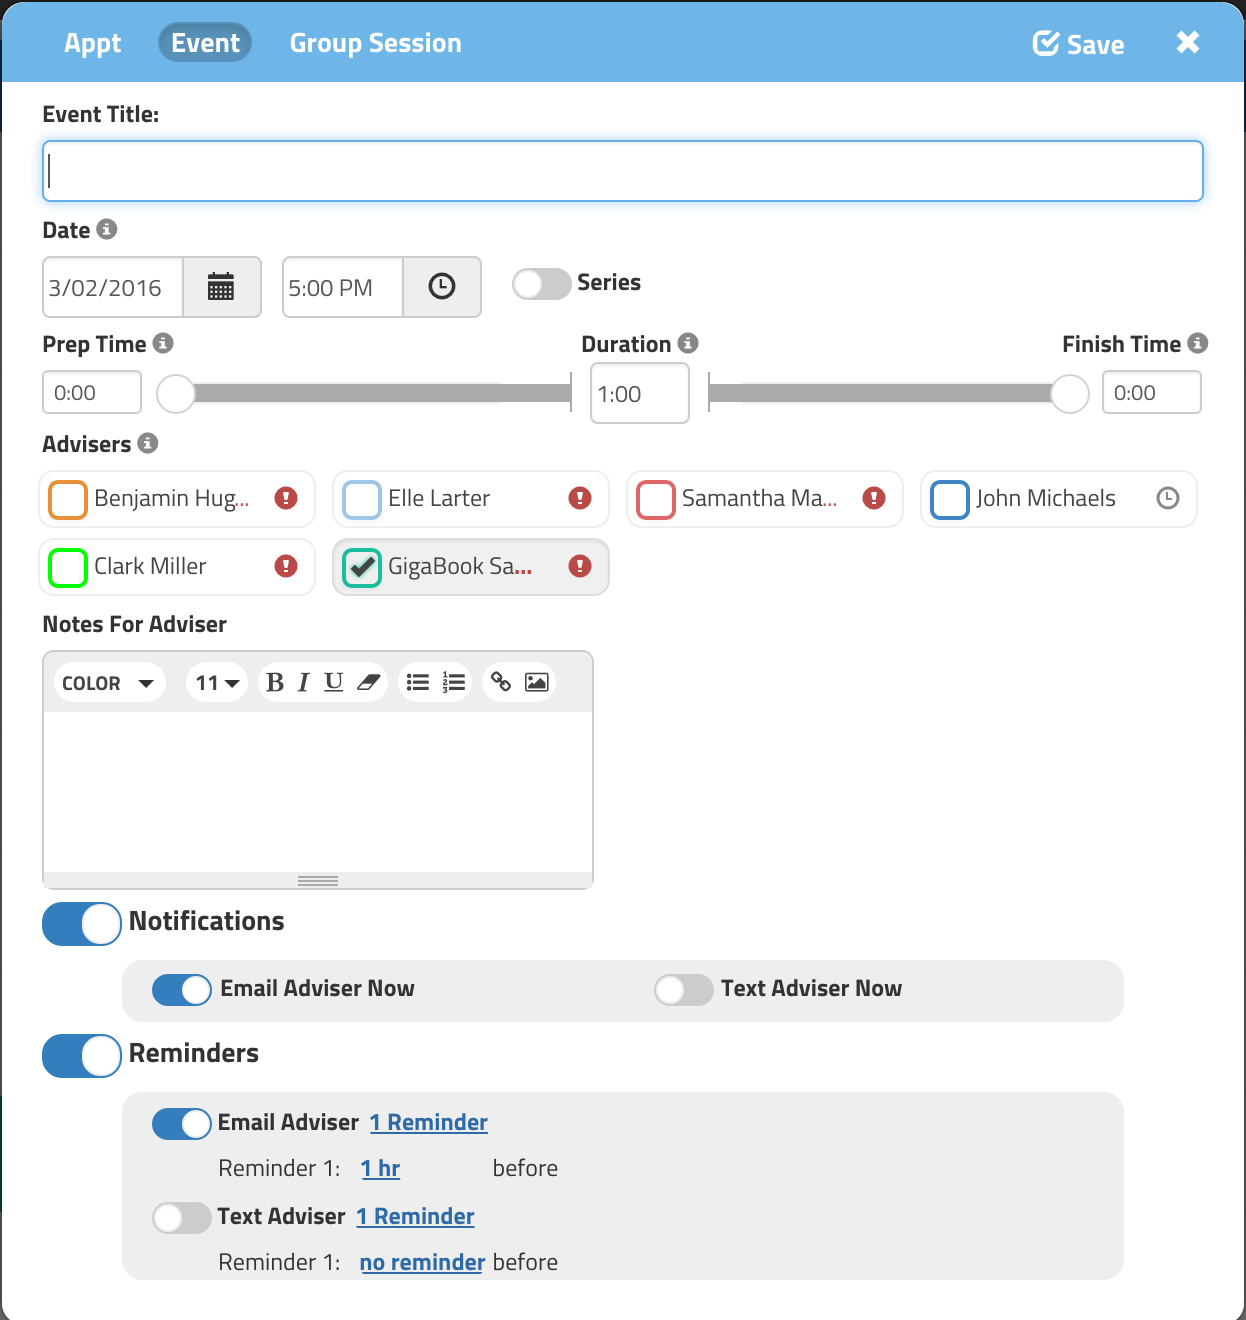
- In the Calendar dropdown on the navigation bar, click on ‘New’ or the Plus icon in the upper right corner of the calendar.
- Click on ‘Event’ at the top of the window.
- Select the service provider.
- Enter event title and any notes necessary.
- If there’s a reoccurring event, click on the repeat button and enter the number of times (days) it will repeat, the date it starts, time, and date it ends.
- Click notification button when event is scheduled to send email and/or text to provider.
- Click Reminders button to send up to three emails and/or up to 2 text messages to provider.
- Click Save and close window.
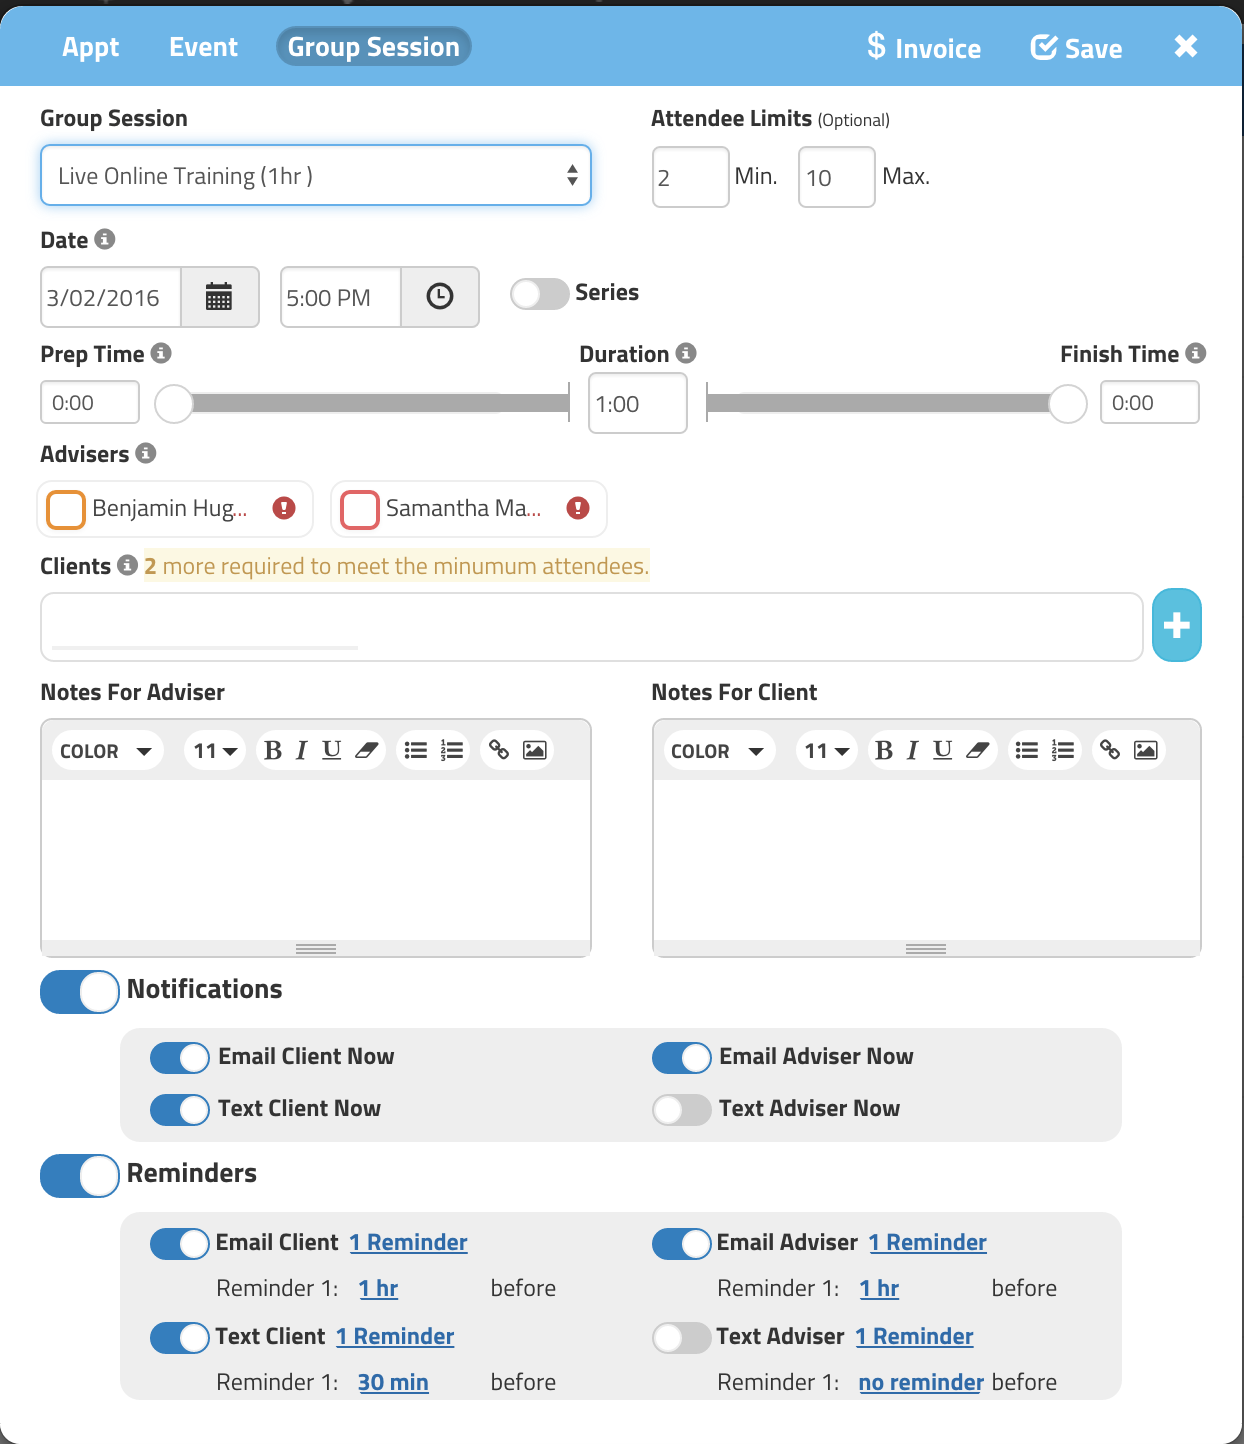
Add Class/Workshop/Other Training
You first need to have created a “Group Session” similar to the addition of a service. Go here to do that: Group Session Settings
- In the Calendar dropdown on the navigation bar, click on ‘New’ or the Plus icon in the upper right corner of the calendar.
- Click on ‘Group Session’ (or whatever you names your group sessions) at the top of the window.
- Enter Title, number of attendees (optional), service providers assigned, names of client(s) and any applicable notes.
- If there’s a reoccurring workshop/class, click on the repeat button and enter the number of times (days) it will repeat, the date it starts, time, and date it ends.
- Click notification button when workshop/class is scheduled to send email and/or text to clients and/or provider.
- Click Reminders button to send up to three emails and/or up to 2 text messages to clients and/or provider.
- Click Save and close window.
Here is what the Group Session Entry Panel looks like:
Review Appointments/Events/Workshops
- Hover cursor over item scheduled on calendar to see information.
Edit Appointments/Events/Workshops
- Click on event and apply changes.
- Click Save.
Delete Appointments/Events/Workshops
- Click on event and click Delete button.
- A reminder will appear to ensure you want to delete this event.
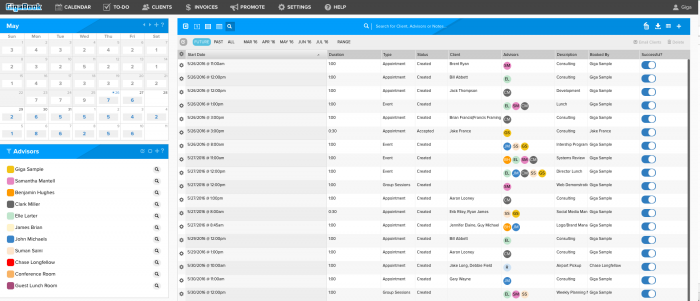
Appointment, Event Calendar Search
- On the Calendar dropdown on the black navigation bar, select Search (or click on the magnifying glass at the top of the calendar) to bring up a list of all appointments.
- Sort any column by clicking on the header.
- View notes by clicking on the magnifying glass.
- Mark appointments that were successful and note the success rate calculated at the top of the page.
- To delete an appointment from the list, click the trashcan icon under the action popup. A popup will ask for confirmation of the deletion.
Here is what the search page looks like:
Generate, Download and Print an Appointment Schedule Report
- On any Calendar page select the down arrow in the upper right corner of the page.
- Select how you want your report sorted (client, provider, service or date), alpha ascending or descending, and whether it is to be portrait or landscape.
Change Calendar Views
- Hover over the Calendar dropdown in the black navigation bar and select daily, weekly or monthly.
- You can also change your view by clicking on one of the gray icons at the top of your selected calendar.
Change Days, Weeks or Months
- Click on the arrows on either side of your calendar to look ahead or back in time.
View Provider’s Appointments/Events
- Click on providers listed to view their schedules on your calendar.
- Clicking on the people icon in the upper right corner of the calendar and selecting them from a drop-down list can also accomplish this.
Download and/or Print Calendars
- To print a specific provider’s schedule of appointments, click on a provider listed on the left column.
- Click the down arrow in the upper right corner of the page to generate download.
Syncing to External Calendars
- You can sync your GigaBook account to various external sites and calendars by utilizing the GigaSync Feature in your account. Visit the GigaSync Settings Page and follow the instructions to learn more about synchronizing your GigaBook Calendar with Google Calendar, iCal or Outlook.


