GigaBook Weekly Calendar Help
Learn more about your GigaBook Weekly Calendar View
 GigaBook’s weekly calendar view is designed to help you view your upcoming appointments and events on a larger scale than the daily view. This can help you quickly view the appointment and event load your business has for the upcoming week. Color coding your providers the way you want will help you easily pick out who has what appointment and when. Make sure to start adding Due Dates to your To Do List items as well so you can see what is due a week in advance. Other efficiency tools like downloadable reports help make your weekly planning as easy as it should be!
Weekly Calendar View
To see a week at a time, go to Calendar in the navigation bar of your dashboard and select Weekly from the dropdown. This will display the current week (7 days, Sunday through Saturday).
On the left side of the page, you’ll find the following:
Small Calendar View
A small version of the current month’s calendar is shown, highlighting the present week in blue. Each day may show a number, reflecting how many appointments you have scheduled—current and future numbers are highlighted in blue, past numbers are gray. By hovering over any of these numbers, you can see the appointments and their times. To view a different month, click on the right or left arrows at the top of that calendar. To see a specific day of that month, click on the day desired. To add an event or appointment, click on the plus sign and complete the information (see Add An Appointment).
Service Providers Key
Below the calendar is a list of your services providers. By clicking on a name, you can see what appointments/events they have scheduled for the week.
Upcoming Appointments and Events Feed
A list of upcoming appointments is shown by date, time, subject and service provider. Clicking on any of the items brings up the ability to edit the event/appointment, or delete it.
Your Weekly View
- Across the top of your weekly calendar are a variety of tools to help keep your week organized. Hovering over the five icons at the top left of your weekly view allows you to change to a daily or monthly calendar, gain access to your tracker report, and expand or shorten the week by changing the number of hours you want shown.
- The current week shows at the top of your calendar—you can view a different week by clicking on the right or left arrows.
- The person icon on the top right provides a dropdown list of your service providers. Selecting a name from this list takes you directly to their calendar.
- To download a PDF and/or print any of the calendars, click on the down arrow icon.
- The plus sign allows you to add an appointment. Another quick way to add an appointment is to click on the appropriate space within the week.
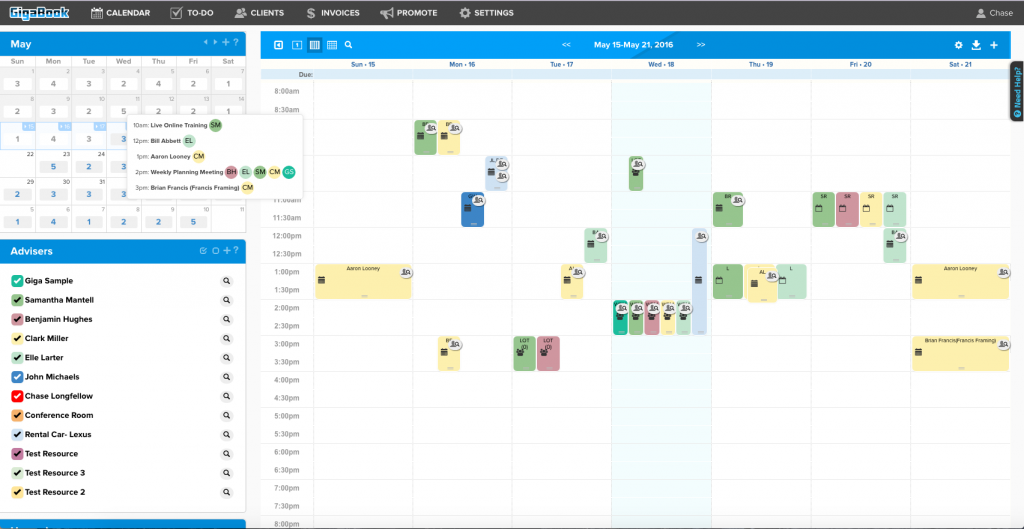
To Do List Due Date Integration
Any tasks created in the To-Do list syncs with the calendar. As a reminder that tasks are upcoming or past due, a green (upcoming) or red (past due) button will appear underneath the date of the week. By hovering over the button you can see which tasks are being highlighted, and can address them in the Do-To Lists window.
Add an Appointment (clients, meetings)
- In the Calendar dropdown on the navigation bar, click on ‘New’ or the Plus icon in the upper right corner of the calendar, or click on the desired time on the weekly view.
- Click on ‘Appt’ at the top of the window.
- Enter Client information.
- Select Service being provided.
- Check provider being assigned.
- Select date and time.
- Enter any notes specific to the appointment.
- If there’s a reoccurring appointment, click on the repeat button and enter the number of times (days) it will repeat, the date it starts, time, and date it ends.
- Click notification button when appointment is scheduled to send email and/or text to client and/or assigned provider.
- Click Reminders button to send up to three emails and/or up to 2 text messages to client and/or assigned provider.
- Click Save and close window.
Add an Event (tasks, lunch appointment, conference)
- In the Calendar dropdown on the navigation bar, click on ‘New’ or the Plus icon in the upper right corner of the calendar, or click on the desired time on the weekly view.
- Click on ‘Event’ at the top of the window.
- Select the service provider.
- Enter event title and any notes necessary.
- If there’s a reoccurring event, click on the repeat button and enter the number of times (days) it will repeat, the date it starts, time, and date it ends.
- Click notification button when event is scheduled to send email and/or text to provider.
- Click Reminders button to send up to three emails and/or up to 2 text messages to provider.
- Click Save and close window.
Add Class/Workshop/Other Training
- In the Calendar dropdown on the navigation bar, click on ‘New’ or the Plus icon in the upper right corner of the calendar, or click on the desired time on the weekly view.
- Click on ‘Workshop/Class’ at the top of the window.
- Enter Title, number of attendees (optional), service providers assigned, names of client(s) and any applicable notes.
- If there’s a reoccurring workshop/class, click on the repeat button and enter the number of times (days) it will repeat, the date it starts, time, and date it ends.
- Click notification button when workshop/class is scheduled to send email and/or text to clients and/or provider.
- Click Reminders button to send up to three emails and/or up to 2 text messages to clients and/or provider.
- Click Save and close window.
Review Appointments/Events/Workshops
- Hover cursor over item scheduled on calendar to see information, OR
- Hover cursor over number on small calendar, OR
- Review list under Upcoming
Edit Appointments/Events/Workshops
- Click on event on calendar, apply changes, click save, OR
- Click on appointment in Upcoming list and apply changes.
Delete Appointments/Events/Workshops
- Click on event shown on calendar and click trashcan icon, OR
- Select event listed under Upcoming and click trashcan icon.
- A reminder will appear to ensure you want to delete this event.
Appointment Tracker
- On the Calendar dropdown on the black navigation bar, select Tracker (or click on the magnifying glass at the top of the calendar) to bring up a list of all appointments.
- Sort any column by clicking on the header.
- View notes by clicking on the magnifying glass.
- Mark appointments that were successful and note the success rate calculated at the top of the page.
- To delete an appointment from the list, click the trashcan icon under the action column. A popup will ask for confirmation of the deletion.
Generate, Download and Print an Appointment Schedule Report
- In Appointment Tracker, select the down arrow in the upper right corner of the page.
- Select how you want your report sorted (client, provider, service or date), alpha ascending or descending, and whether it is to be portrait or landscape.
Change Calendar Views
- Hover over the Calendar dropdown in the black navigation bar and select daily, weekly or monthly.
- You can also change your view by clicking on one of the gray icons at the top of your selected calendar.
Change Days, Weeks or Months
- Click on the arrows on either side of your calendar to look ahead or back in time.
View Provider’s Appointments/Events
- Click on providers listed to view their schedules on your calendar, OR
- Click on the people icon in the upper right corner of the calendar and selecting them from the drop-down list.
Download and/or Print Calendars
- To print a specific provider’s schedule of appointments, click on a provider listed on the left column.
- Click the down arrow in the upper right corner of the page to generate download.


